The Exposure Triangle Explained for Film Photography
By Andrea Ross
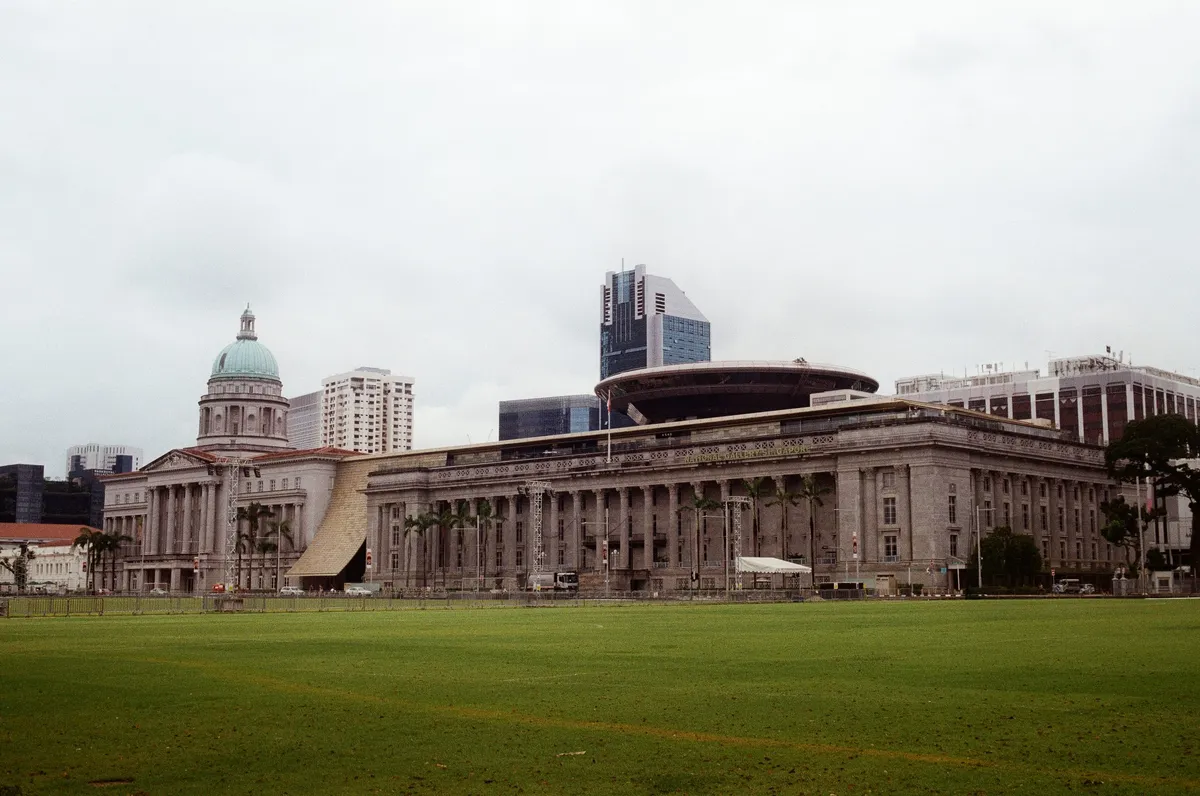
The exposure triangle isn’t a film-specific concept, but film is where it actually bites. There’s no LCD to check your result, no free reshoot if you guessed wrong, and — the part that trips people up coming from digital — your ISO is locked for the entire roll, not adjustable frame to frame. Get comfortable with how aperture, shutter speed, and ISO trade off against each other, and a roll of film stops feeling like a gamble.
Why this matters more on film than digital
On a digital body, a bad guess costs you a glance at the histogram and a retake. On film, a bad guess costs you a frame you won’t see until the roll is developed — sometimes weeks later. And because ISO is fixed by whichever roll is loaded, you only have two variables to actually adjust in the moment: aperture and shutter speed. That constraint is exactly why understanding the triangle properly matters more here, not less — you’re working with fewer knobs, so you need to actually understand what each one does rather than lean on a live preview to bail you out.
Aperture: light and depth of field
Aperture is the opening in the lens that controls how much light reaches the film, measured in f-stops — counterintuitively, a smaller f-number (f/1.4) means a wider opening and more light, while a larger f-number (f/16) means a smaller opening and less light. The same setting also controls depth of field: wide open, only a thin slice of the frame is in sharp focus; stopped down, much more of the scene reads sharp front to back.
A practical way to build intuition: f/1.4 to f/2.8 is “isolate the subject,” f/5.6 to f/8 is “general use, forgiving depth of field,” and f/11 to f/16 is “everything in focus, landscape territory.” I made that call directly on the hero image above — I shot the National Gallery Singapore’s facade at f/5.6 specifically because I wanted the architectural detail sharp across most of the frame without needing to stop all the way down to f/16 and lose the shutter speed I’d have needed to hand-hold steadily in that light.
Shutter speed: light and motion
Shutter speed controls how long the film is exposed, and like aperture, it also has a second job: freezing or blurring motion. A fast shutter (1/500s and up) freezes movement; a slow one (1/30s and below) lets motion blur into the frame, whether that’s a deliberate creative choice or just camera shake you didn’t want.
For handheld shooting without stabilization, a practical floor — tighter than the textbook reciprocal rule of “shutter speed roughly matching your focal length” — is to not trust yourself below about 1/60s with a normal lens unless you’re deliberately bracing against something solid. Below that, the odds of visible shake creeping into an otherwise well-composed frame go up fast.
ISO: fixed per roll, and why that matters
ISO measures the film’s sensitivity to light — higher ISO needs less light to expose correctly, at the cost of more visible grain. On digital, you can change ISO frame to frame to compensate for changing light. On film, ISO is baked into the roll you loaded, so it’s the one corner of the triangle you commit to before you start shooting, not adjust in the moment.
That single fixed variable changes how you think about the other two. Instead of asking “what ISO do I need for this light,” you’re asking “given the ISO I already committed to, what aperture and shutter speed combination gets me a correct exposure right now” — a subtly different, more constrained problem that rewards understanding the trade-off between the other two corners rather than reaching for a third dial.
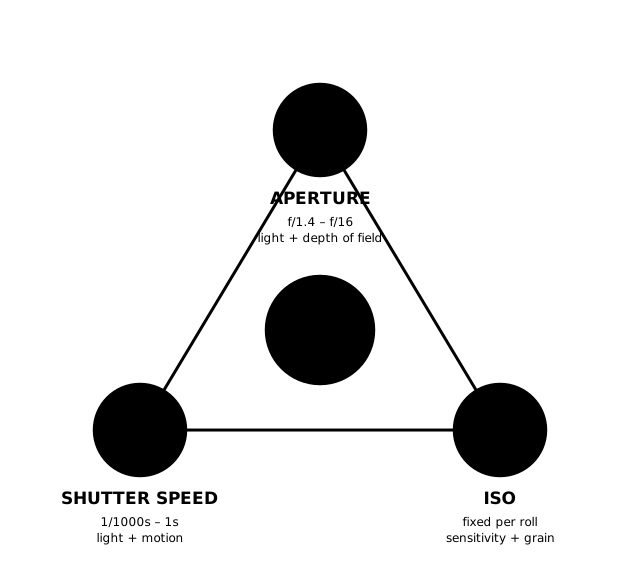
A quick visual recap before the worked example below: all three corners have to balance to reach a correct exposure — which corner you prioritize is what actually shapes what the shot looks like.
How the three interact: one worked example
Say you’re shooting ISO 200 film in daylight bright enough for a baseline exposure of f/8 at 1/250s. That’s one correct exposure — but not the only one. Move to f/5.6 (one stop more light from the wider aperture) and you need to compensate with 1/500s (one stop less light from the faster shutter) to land on the same total exposure, now with shallower depth of field. Move instead to f/11 (one stop less light) and you’d need 1/125s (one stop more light) to compensate, now with deeper depth of field and a slightly higher motion-blur risk if your subject’s moving.
All three of those combinations expose the film identically. What changes is what the photo actually looks like — how much is in focus, and how frozen or blurred any motion is. That’s the real lesson of the triangle: it’s not really about getting “a” correct exposure, it’s about choosing which correct exposure, out of several available, actually serves the shot you’re trying to make.
What under, correct, and over exposure actually look like
The worked example above is abstract until you can see the result. Here are three real frames from my own rolls, each landing in a different place on the exposure scale, with the settings that got them there.
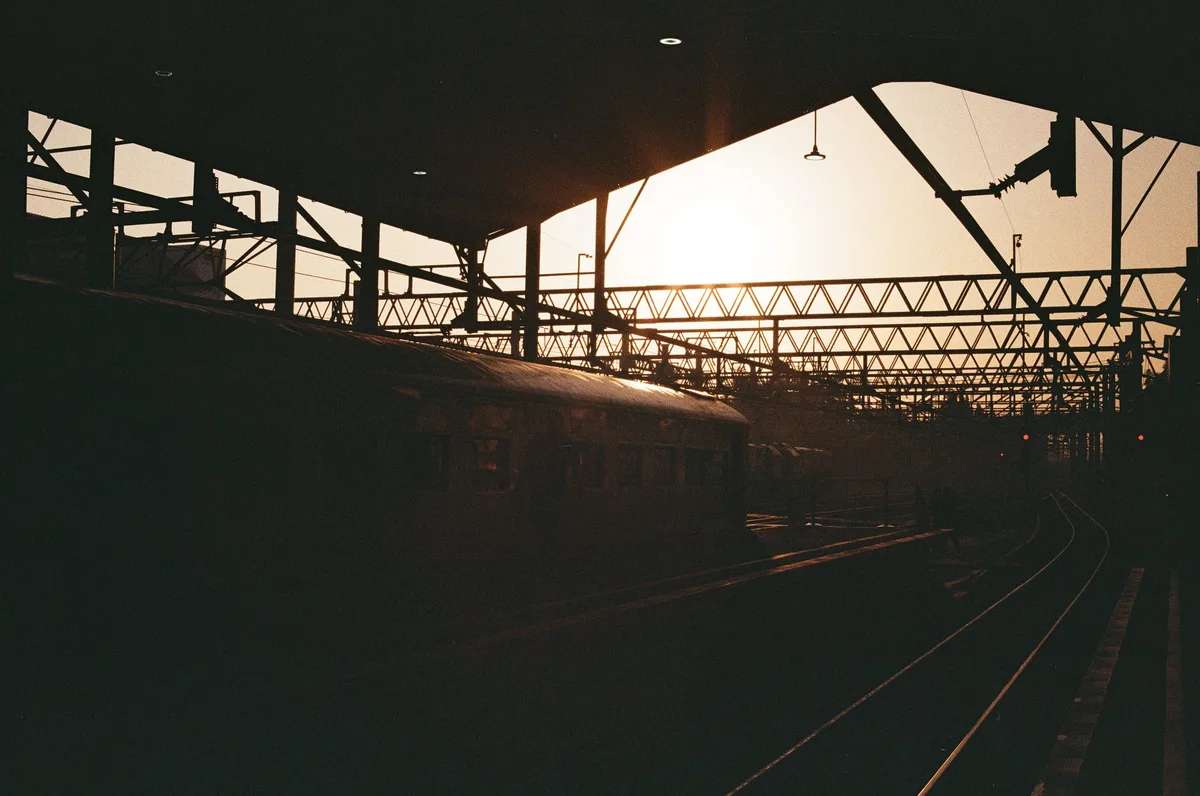
Underexposed — 40mm f/2.8 pancake at f/4, around 1/60s, Ilford HP5 Plus. I metered for the bright sky rather than the platform, which pushed the train and structure several stops under. Shadows crush to near-black with no recoverable detail — here that’s a deliberate silhouette effect, but it’s exactly what an accidental underexposure looks like too.
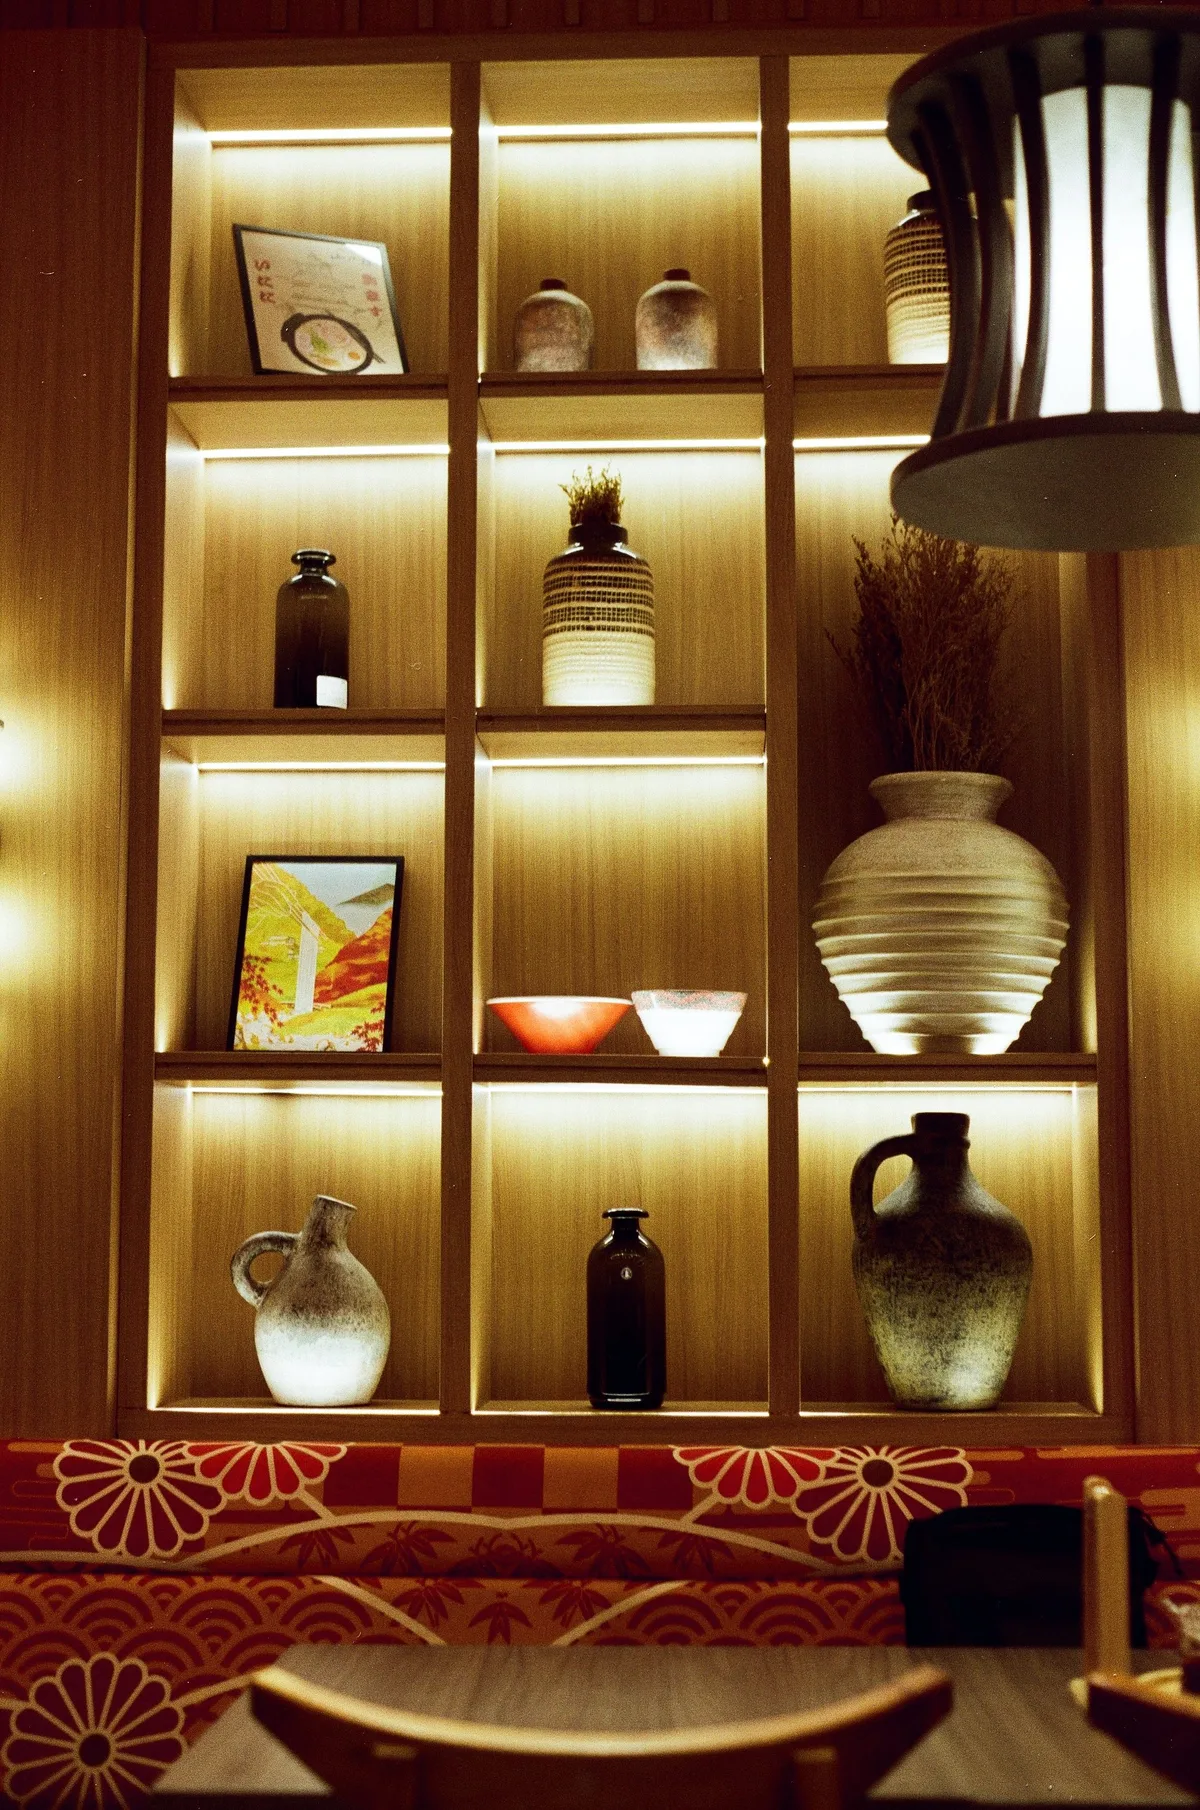
Correct — 50mm f/1.4 at f/2.8, 1/30s (braced against the table edge rather than handheld), Kodak Portra 400. Detail holds in both the brightest lit shelf interiors and the darker corners between them — nothing crushed to black, nothing blown to solid white.

Overexposed — 50mm f/1.4 at f/2, 1/125s, Kodak Gold 200. I metered for the blossoms in the shade of the tree, which left the greenhouse structure behind them several stops over. Look at the upper-left background: there’s no texture or structure left, just blown-out white — that’s the highlight equivalent of the crushed shadows in the underexposed frame above.
Common beginner mistakes
- Chasing “correct” exposure without deciding what you actually want. Any of several aperture/shutter combinations can be technically correct — the mistake is defaulting to whichever one your meter suggests first instead of asking what depth of field or motion treatment the shot needs.
- Forgetting your loaded ISO mid-roll. Easy to do if you shoot multiple bodies loaded with different stocks — metering as if you’re still on the roll you had in a different camera last week.
- Treating shutter speed purely as an exposure tool and ignoring motion. A “correctly exposed” frame can still be ruined by unintended blur if you picked a slow shutter speed purely to compensate for a small aperture, without checking whether your subject (or your hands) could hold still for it.
A simple mental framework for the field
When you don’t have time to do the math: decide what matters most for the specific shot — depth of field or motion — and let that decide your starting point. If depth of field matters most (a portrait, a detail shot), pick your aperture first and let shutter speed follow to match the light. If motion matters most (something moving, low light where camera shake is the risk), pick your shutter speed first and let aperture follow instead. Either way, you’re only ever solving for one remaining variable at a time, with your ISO already fixed for the roll — which is a much faster decision than trying to juggle all three at once.
Read next: Pentax KM Review for how these settings play out on the body used throughout darkroom.id’s Journal, or Types of Film Cameras Explained if you’re still deciding what to shoot with.
Andrea Ross
Reviews and writes about gear, technique, and editing for darkroom.id.